
Let’s talk about how to organize recipes – because let’s be real, recipes are getting out of hand. My friend has a kitchen shelf full of food magazines and cookbooks her husband buys because he knows she loves trying new things in the kitchen. Another friend has a file with her mom’s priceless hand-me-down recipes. And don’t get me started on the Pinterest board, saved recipes from Instagram and TikTok and the screenshots people take every time they come across a nice recipe.
It’s frustrating because it takes an hour to find the specific recipe you are looking for when you need one. So you, my friend, may have the same issue. Which is why I had to find a better way to organize recipes.
Best Way to Organize Recipes: Paper vs. Digital
I went with both options when organizing my recipes, and I recommend doing the same. Both have their pros and cons that we should appreciate.
Paper
Pros
- Sentimental value. You can have your Nanas’ handwritten recipes that have been passed down three generations now. Keeping them in their original format and seeing Nana’s handwriting is what makes them special.
- Cost. Paper recipes are inexpensive, and there are no subscription fees or software to navigate.
Cons
- Harder to read, especially as the papers have aged and lost their integrity.
- Hard to search when I need to find a recipe in a hurry.
- Prone to getting wet, dirty and torn, not to mention misplaced permanently.
- They take a lot of space and can create a mess.
Digital
Pros
- Digital recipes on an app or computer are easier to keep and harder to lose.
- It’s easy to search for a recipe digitally because you can just write the name on the search tab.
- Easiest to share with others via email, WhatsApp, and social media.
- Easy access and portability wherever you might need it, be it in the store or while travelling.
- Easier to organize and eliminates clutter and papers everywhere.
Cons
- Lack of tactile experience. There’s a certain comfort and joy one gets from flipping through an old cookbook or your grandma’s recipe book that you just don’t get when recipes are stored digitally. Unless, of course, you use OrganizEat, but we will get to that later.
- Technological devices are prone to damage and malfunctions, and nothing lasts forever. Most of the time, you also need internet connectivity to access the recipe.
Sorting and Decluttering Recipes
Whether you’re keeping your paper recipes or digitizing them, the first step is the same: sorting through what you have. This helps you see your entire collection, decide what you want to keep, and let go of what’s just taking up space. Sorting before organizing not only makes the process easier but also gives you perspective on what you actually need.
Some recipes – if being honest – you will never make. Others have ingredients your family doesn’t eat, and some are just plain unrealistic. Also, how many cookie recipes does one person need?
So here’s where we start.
1. Gather all your recipes together
Prepare a work area and bring all the cookbooks, printed and magazine clippings, recipe boxes, and journals. Then, gather all your digital files in a folder and a document with all the links you can gather. Bring it all.
2. Section into piles
Start with the loose ones because they are easier to lose and get out of hand. I suggest categories such as:
- Family favorites/Most used
- Hand me down treasures
- Excited to try
- Can go
Be honest with yourself on that last one. If you haven’t used a recipe for a year and don’t see it being used soon, toss it. If you have something similar, or have tried a recipe and didn’t like it, throw that in the Can Go pile too. We want to only keep those that are most likely to be used and enjoyed.
The last thing is how to organize recipes from magazines.
This is easy- I took photos of the recipes I needed and clipped out the ones I really wanted in paper format and then threw the magazines in the Can Go pile. You really do not need all those magazines in your drawers and tables.
3. Sort Digital Recipes
Open your screenshots, your Pinterest board, and your bookmarked recipes on your computer. You want to sort through these as well and get rid of what’s not useful currently. Looking through them will also bring your awareness to one you may have forgotten you have.
4. Do a Second Sort
With the remaining stash, make another list of categories. Some do seasons, some meals (breakfast, lunch, dinner), and some choose food categories. Besides breakfast recipes (I put everything breakfast in the same pile), the rest are categorized into;
- Pasta
- Salads
- Poultry
- Vegetables
- Dessert
- Fast food
- Beef/port
- Soups
5. Protect and Preserve
The last sorting part is preserving paper recipes that are prone to damage. Page protectors are perfect for hand-me-down recipes that have survived generations. They also store perfectly in binders, and you can just take the recipe out when you need to use it without worrying about damage.
However, I would also recommend taking pictures of your most valued recipes and saving them on OrganizEat, just to be sure they are well preserved and you can never lose them.
How to Organize Recipes Electronically Using OrganizEat
When it comes to organizing recipes electronically, OrganizEat has been the most helpful. OrganizEat is a recipe organizer app that app allows me to have all my recipes, and I mean all, in one, searchable location on my phone or tablet.
Remember how I said one of the cons of using an app is that it doesn’t have sentimental value? Well, that’s not the case with OrganizEat.
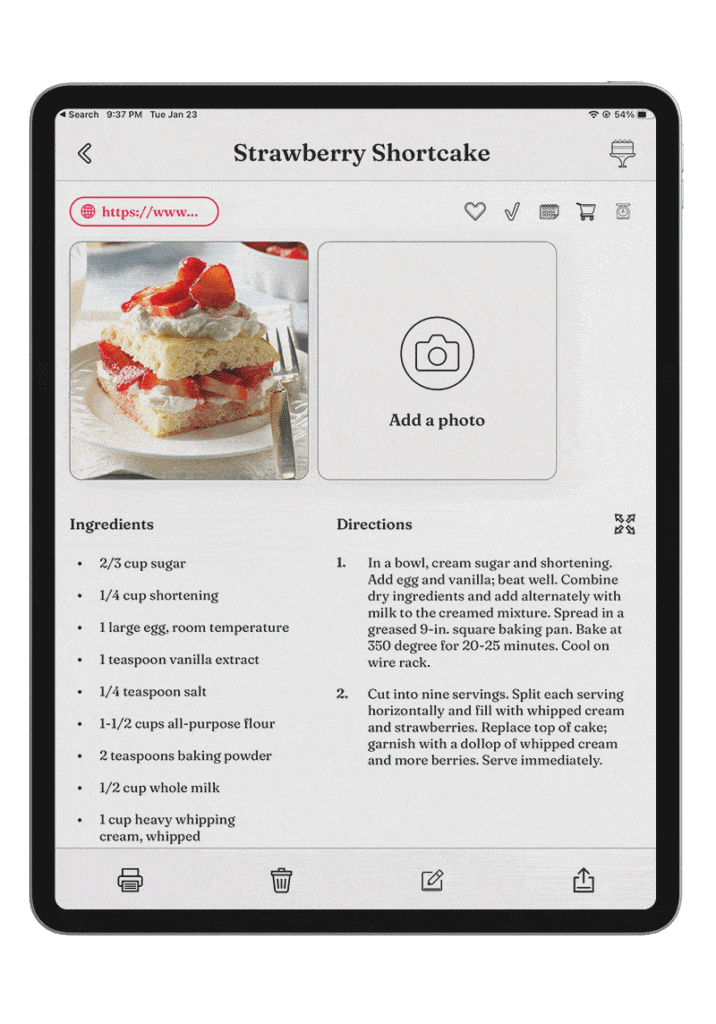
This app helps me retain the sentimental value of hand-written recipes, as I can take pictures and the app will turn the image into text without changing the handwriting. I’ve done these with my treasured hand-me-down recipes from my nana and mom.
I also get to take pics or scan only what I need from cookbooks and food magazines, which has helped keep all magazines out of my kitchen.
But the best part about OrganizEat for me is the import feature. With a tap of a button, I can import any recipe I like from the web, and it remains in my database even if the original recipe page is removed. I can’t tell you how many times I’ve saved recipes on Facebook and Instagram, only not to find them later.
Oh, and it solves all my sorting and organizing issues since I can categorize them by meal, cuisine, diet, among other options. Talk about a great way to use hashtags.
Step-by-Step Plan to Organize Recipes on the OrganizEat App
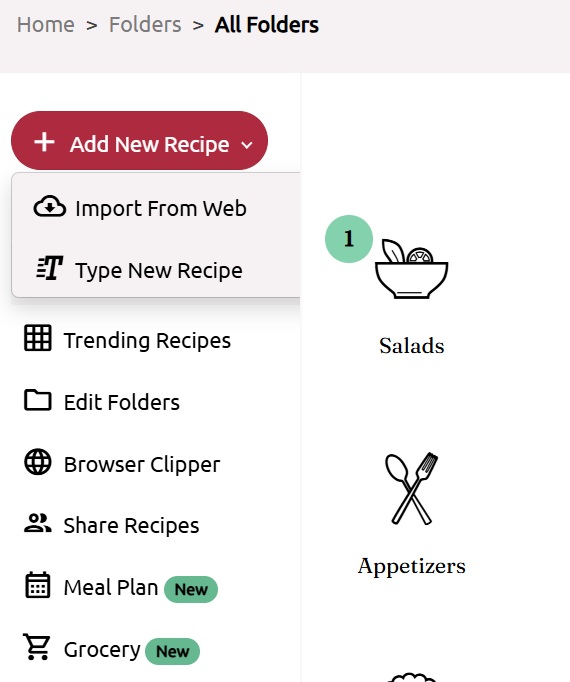
So, how do you use OrganizEat to save recipes? First, download OrganizEat on your phone or create an account on the web app.
Now you can start uploaditng your recipes – as photos, links you saved from blogs or social media, or type out the recipes. Then sort them into categories. You can also add tags and take notes.
Import a Recipe From Social Media
Find recipes you like on social media (TikTik, Instagram, Facebook, etc.) and save it directly to your OrganizEat account using the Share button. To the full guide: save recipes from social media.
Import a Recipes From a Website
Open the OrganizEat app on your phone and Click on the big red plus button.
Then choose Import From Web.
How to Snap ‘N Store Recipes
Open the OrganizEat app on your phone and Click on the big red plus button.
If you have already taken images of your recipes, click on photos and choose the recipes you want to upload.
If you haven’t taken the images, click on camera and the app will open your phone’s camera so you can take a photo.
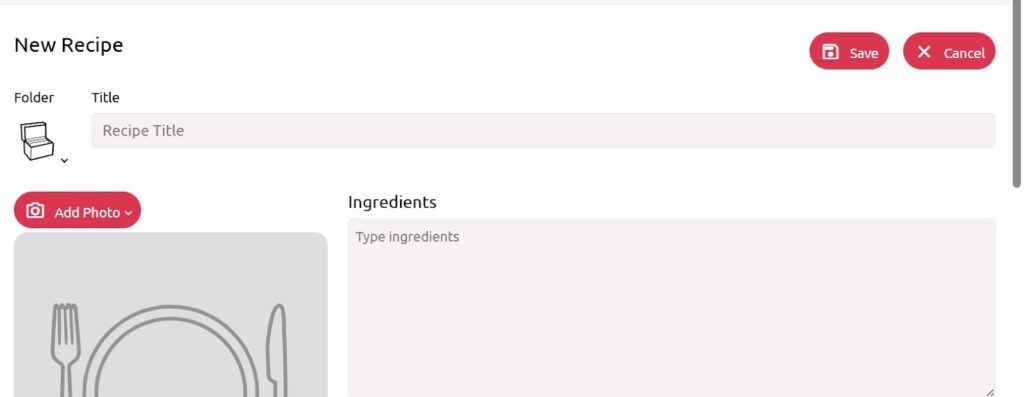
Once you take the photo, name your recipe, organize it in a folder or category, and click on save. That’s it.
Pro-tip: when uploading the recipes image via the phone, it extracts the text out of the image. So you can have the hand written precious recipe, and read it easily, too.
Web Import
See a recipe you like on the web? Import with a tap of one button! Once you log in to OrganizEat, click on ‘add new recipe’. You will see two options: import from web and type a recipe. Click on import from web.

Paste the link from which you want to import the recipe, and click on import.
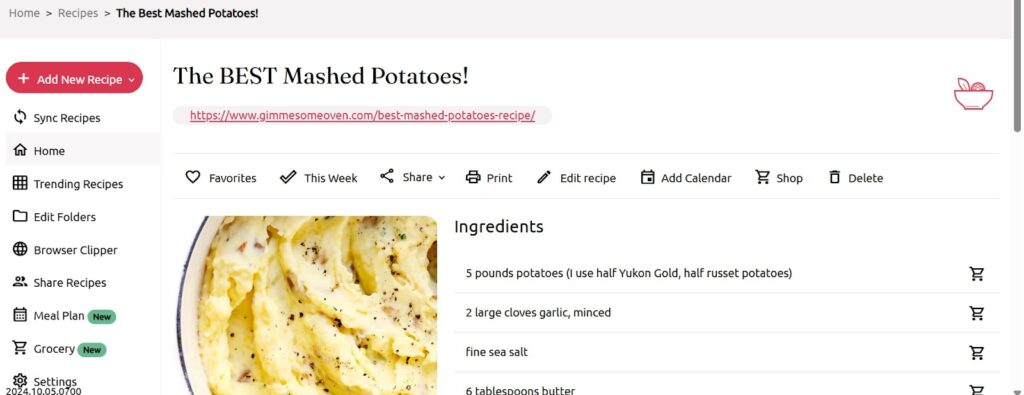
You can click on edit recipe to change anything you’d like and save it to whatever folder you prefer.
Custom Entries
Type or copy-paste your recipe directly into the app. OrganizEat has an Intuitive template for listing ingredients and directions, and you can structure it as you want – no mandatory fields.
Always ensure you back up your recipes to the cloud and sync across all your devices for easier access.
How to Organize Paper Recipes
If you did the sorting and categorizing we talked about earlier, you are ready to organize your paper recipes in a way that will make cooking fun and easy. There are many ways to do this but I recommend this one; A recipe binder.
- Purchase a sturdy binder to organize your recipes: A three-ring binder is big enough and allows for easy addition and removal of pages.
- Use clear sheet protectors: Protectors also known as plastic sleeves protect your recipes from damage. This is especially vital for frequently used recipes and those you want to last a long time. These sleeves fit perfectly in a binder, making it look like a traditional photo album that you can just open on your counter top and follow while cooking.
- Create sections: Use tab dividers to separate your binder into categories (e.g., breakfast, meats, appetizers, main dishes, desserts). Label each tab clearly for easy access.
- Add a recipe index: Create an index on the first page of your binder with all the recipes by category. This saves you time when you’re looking for something specific.
- Add themed sections: Have a section for specific seasons or occasions (like holidays) to make it easy to find recipes relevant to a specific time or season and be sure to include it in the index.
- Label the spine of your recipe binder so you can easily find it. That said, I made a shelf near the fridge where my favorite cook books and meal planner stay, and it’s where the two recipe binders stand proudly. This way everything is within easy reach and everyone can see them.
Conclusion
When we discuss how to organize recipes, the idea is not so much decluttering recipes but making work easier. You want everything from meal planning to finding recipes and even grocery shopping to take as little time as possible and be easy.
The OrganizEat app makes all this possible. Once you have organized your recipes on the app, you can plan meals for an entire week or two. Schedule your desired recipes on the calendar and request the app to generate a grocery list for you. You can then print this list along with the weekly meal plan or just keep them digital.
And once you actually get to cooking, you get to view your recipe in full screen and it stays on, no matter how long you take to prepare the meal.
And the best part is, you can share your favorite recipes with family and friends straight from the app to any other media. Or, just invite them to connect on OrganizEat where you can view each other’s recipes and share the joy.
How to Organize Recipes FAQs
The best way to organize your recipes is what makes work the easiest for the user. Generally, a recipe organizing app like OrganizEat or a 3-ring binder with sheet-protected recipes work best. Both methods allow easy access and ease of use.
Use the OrganizEat app to store, categorize, and search all your recipes—whether typed, imported from the web, or photos of handwritten notes—all in one place.
Start by sorting through all your paper and digital recipes, keep only what you actually use, and organize the rest into clearly labeled categories or a recipe binder.