Tired of losing track of recipes? Organizing recipes by their source can save you time and make meal planning easier. Whether it’s Grandma’s handwritten recipe card or a bookmarked food blog, grouping recipes based on where they came from helps you locate them faster and preserve sentimental favorites. Here’s how to do it step-by-step:
- Collect recipes: Gather all physical (cookbooks, index cards) and digital (screenshots, bookmarks) recipes in one place.
- Sort by source: Separate recipes into categories like physical or digital, and label them by their origin (e.g., "Family", "Website").
- Digitize recipes: Use apps like OrganizEat to snap photos of physical recipes or import online ones for easy access.
- Tag and organize: Add tags like #Family or #Website to make recipes searchable. Combine tags for specific searches (e.g., #Dinner + #30Minutes).
- Maintain your collection: Regularly update, clean up, and sync recipes across devices.
This system keeps your recipes organized, accessible, and easy to share with family and friends. Ready to transform your recipe chaos into order? Let’s dive in.
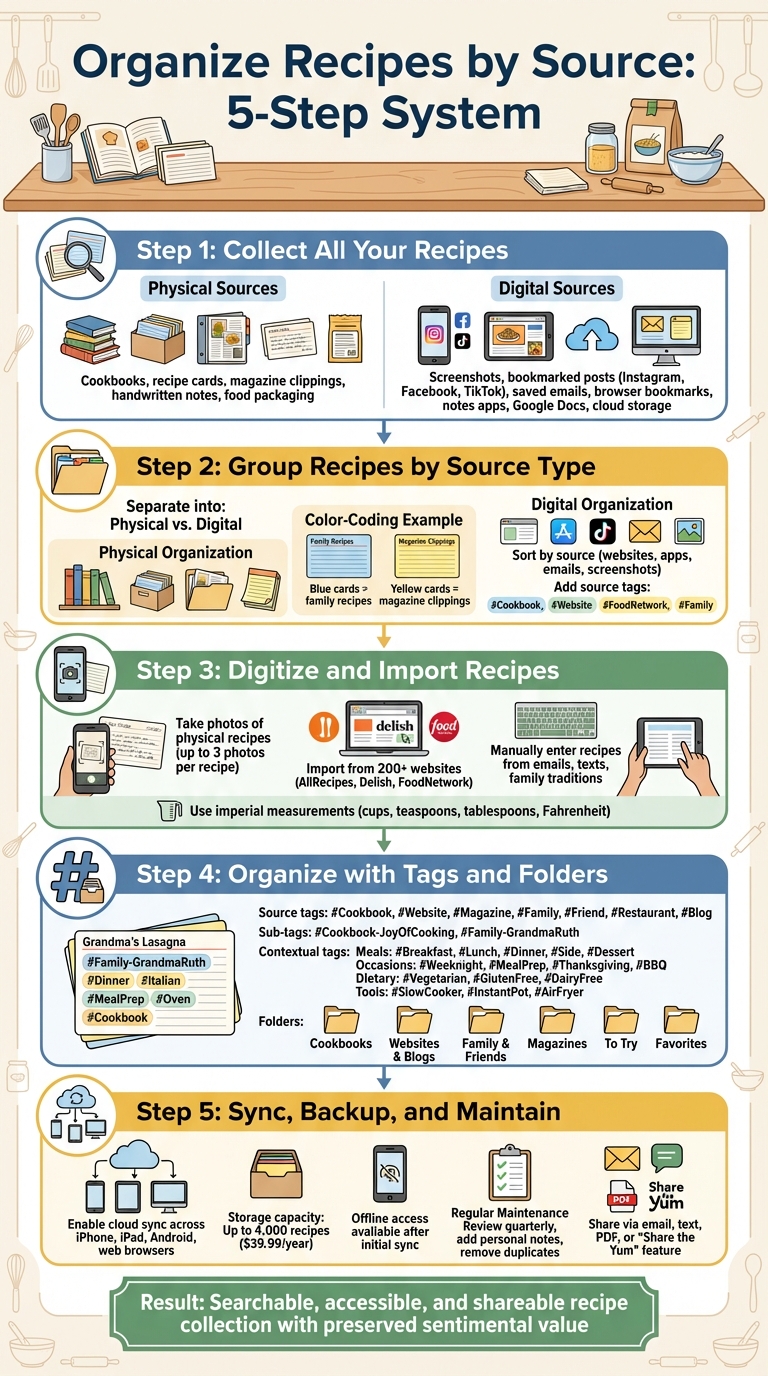
5-Step Recipe Organization System by Source
Step 1: Collect All Your Recipes
List All Your Recipe Sources
Start by identifying where all your recipes are kept. Physical sources might include cookbooks, recipe cards, magazine or newspaper clippings, handwritten notes, or even packaging from food products. On the digital side, think about screenshots on your phone, bookmarked posts from platforms like Instagram, Facebook, or TikTok, saved emails, browser bookmarks, notes apps, Google Docs, or cloud storage services like Dropbox.
"If you never start, you’ll never finish, so go ahead and dive in." – Gina Fisher, Author
Once you’ve pinpointed every source, you’re ready to gather your recipes.
Gather Recipes from Each Source
Now that you’ve listed all your sources, it’s time to collect the recipes. For physical recipes, gather everything into one spot. This might mean pulling out index cards, choosing key cookbooks to keep, and collecting magazine clippings or printed recipes.
For digital recipes, the process is a bit different. Use your email’s search function with keywords like "recipe", "ingredients", or "instructions" to rediscover old favorites. Check your phone’s photo gallery for recipe screenshots. Don’t forget to sift through your saved posts on social media and browser bookmarks. Once you’ve gathered everything, store it temporarily in one place to make organizing easier.
Digital Recipe Book: How I Organize My Recipes | k. jo
Step 2: Group Recipes by Source Type
Start by organizing your recipes based on where they came from. Keep physical and digital recipes in separate groups. This makes it easier to track down that amazing lasagna recipe or your grandmother’s cookie instructions. Typically, recipes fall into two main categories: physical and digital. Sorting them this way will also make digitizing your collection much simpler.
Organize Physical Recipes
For your physical recipes, group them by type – cookbooks, index cards, magazine clippings, or handwritten notes. If you have irregular items like magazine cutouts, consider taping them onto standard 3×5 or 4×6 cards so they fit neatly in a recipe box. You can also use color-coding to make things easier to find. For instance, blue cards could represent family recipes, while yellow cards could be for magazine clippings. For those sentimental handwritten recipes, photo albums or scrapbooks work great, especially if you include pictures of the person who shared the recipe with you.
Sort Digital Recipes
Digital recipes need their own system. Separate them by source – whether they came from websites, apps, emails, or screenshots. To keep everything in one place, consolidate these recipes into a single, searchable location. You might also want to create a special "To Try" section or tag to keep track of new recipes you haven’t tested yet, while keeping your tried-and-true favorites organized.
Add Source Tags
Label each recipe with its source, like "Cookbook: Joy of Cooking" or "Website: Food Network." For digital recipes, hashtags can be a lifesaver. Adding tags like #Cookbook or #FoodNetwork in the notes section makes it super easy to search for recipes by their source.
Step 3: Digitize and Import Recipes into OrganizEat

Bring all your recipes – whether handwritten, online, or emailed – into one place with OrganizEat. The app makes it easy to store photos, import from websites, or manually input recipes without losing the organization you’ve already set up.
Take Photos of Physical Recipes
Got recipe cards, cookbooks, or handwritten notes? OrganizEat lets you snap photos and store them instantly. Open the app, tap "New Recipe", and choose "Snap ‘n Store." Lay your recipe on a flat, well-lit surface, take a picture, and add a title and folder right away. This prevents recipes from ending up in a generic "Others" folder. Each recipe can include up to three photos for better clarity.
"Snap a photo of your recipe, whether a physical copy or a snapshot from the Internet, and store it in one easy step." – OrganizEat
To make these photo-based recipes easier to find later, tag them with their source and add keywords for key ingredients.
Import Recipes from Websites
OrganizEat’s Web Import tool is a game-changer for online recipes. It works with over 200 websites, including AllRecipes, Delish, and FoodNetwork. When you find a recipe you love, tap Share > OrganizEat > choose a folder > tap "Sync Recipes" to import ingredients and instructions automatically. If OrganizEat isn’t in your Share menu, scroll to the end, tap "More" (three dots), locate OrganizEat, and enable it.
For recipes on Instagram, TikTok, or unsupported sites, take a screenshot and use the "Snap ‘n Store" feature to save them.
Manually Enter Other Recipes
Some recipes, like those from emails, text messages, or family traditions, need a personal touch. Tap "New Recipe" and select the manual entry option to type or paste in the title, ingredients, and instructions. Use line breaks to separate ingredients and steps, so the app can organize them into fields automatically.
"In order to save a recipe, you don’t have to type… but if you want to enjoy the more efficient search abilities: we strongly recommend that you do as little typing as tagging the main ingredients and keywords." – OrganizEat FAQ
Stick to imperial measurements (cups, teaspoons, tablespoons) and Fahrenheit temperatures to match U.S. cooking standards. If a recipe doesn’t fit the typical format, use the free text note feature to capture all the details.
Pro Tip: Always tag recipes with their source – like "Website: NYT Cooking", "Grandma’s Blue Binder", or "Family Email" – so you can easily find them later. This step sets the stage for seamless organization in OrganizEat, which we’ll explore further in the next steps.
sbb-itb-6688478
Step 4: Organize Recipes Within OrganizEat
Once all your recipes are imported into OrganizEat, it’s time to fine-tune your organization system. The app uses a combination of tags and folders, making it easy to find recipes quickly. Most home cooks tend to remember recipes by their source – like “Mom’s mac and cheese” or “the brownies from Smitten Kitchen.” Organizing by source keeps things intuitive. From there, you can add specific tags to streamline your searches even further.
Use Source-Based Tags
Start by creating a set of high-level tags for recipe sources: #Cookbook, #Website, #Magazine, #Family, #Friend, #Restaurant, #Blog. Assign one of these tags to every recipe as you add it. For more specificity, use hyphens to create sub-tags that identify the exact source, such as #Cookbook-JoyOfCooking or #Family-GrandmaRuth. This system keeps your tags organized and prevents confusion. For instance, tagging with #Family-GrandmaRuth ensures the app treats it as a single searchable tag, unlike “#Family Grandma Ruth,” which might not function as intended.
In OrganizEat, adding these tags is straightforward. Just tap the hashtag icon while editing a recipe. Even photo-based recipes, like a snapshot of a handwritten card, become searchable once tagged. For example, a photo of Grandma Ruth’s banana bread recipe could be tagged as #Family-GrandmaRuth + #Card to capture both the person and the format.
"You cannot search pictures, but by adding short tags for main ingredients and keywords, you make your recipe searchable." – OrganizEat FAQ
Once you’ve added source tags, you can take organization to the next level by combining them with contextual tags.
Combine Tags for Better Searches
Layering source tags with additional tags makes finding recipes even easier. For instance, Grandma Ruth’s banana bread might be tagged as #Family-GrandmaRuth, #Dessert, #Baking, while a quick skillet dinner from a website could be tagged as #Website-SeriousEats, #Dinner, #30Minutes, #Skillet. This approach allows you to answer specific questions like, “What family recipes can I make for Thanksgiving?” by searching for #Family + #Thanksgiving.
Here are some practical tag categories for U.S. home cooks:
- Meals: #Breakfast, #Lunch, #Dinner, #Side, #Dessert
- Occasions: #Weeknight, #MealPrep, #Thanksgiving, #BBQ, #GameDay
- Dietary Needs: #Vegetarian, #GlutenFree, #DairyFree
- Tools: #SlowCooker, #InstantPot, #AirFryer
Feel free to mix and match. For example, a recipe might be tagged as #Website-FoodNetwork + #Dinner + #Weeknight + #30Minutes or #Cookbook-AmericasTestKitchen + #Dessert + #Holiday.
"Using tags this way, and combining tags, you can create unlimited number of ‘subfolders’ suited exactly for your needs." – OrganizEat FAQ
Use Folders for High-Level Grouping
Folders act as broad categories or “bookshelves,” while tags handle the detailed sorting. Keep your folder list short and easy to navigate. Options like Cookbooks, Websites & Blogs, Family & Friends, Magazines, To Try, Favorites work well. Within each folder, the tags take care of the finer details.
OrganizEat lets you customize, rename, and reorder folders, and you can even add icons for quick visual cues. Since folders and tags sync across all your devices, your organization stays consistent whether you’re using an iPhone, Android, iPad, or a web browser. Recipes that aren’t assigned to a folder will default to the “Others” folder, but you can move them later and add the necessary tags.
Pro Tip: Review your tags every few months to merge duplicates (e.g., #NYTCooking vs. #Website-NYTCooking) and remove ones you no longer use. This keeps your system clean and efficient.
Step 5: Sync, Backup, and Maintain Your Collection
After organizing your recipes by source, the next step is to make sure your collection stays safe, accessible, and up-to-date. You’ve put in the effort to tag and organize everything – now it’s time to protect it. With OrganizEat’s cloud features, you can sync recipes across all your devices and keep your collection secure. Regular maintenance ensures your system remains efficient and that you can always find what you need. Here’s how to keep your recipe collection current and shareable.
Turn On Cloud Sync
To enable cloud sync, head to OrganizEat’s settings, tap "Backup & Sync," and toggle it on. Sign in with your account and hit the sync icon to update your collection across devices. Once synced, your recipes will be accessible on iPhones, iPads, Android phones, and even web browsers on Windows or Mac. Plus, after the initial sync, your recipes will be available offline too.
With a subscription priced at $39.99 per year, your cloud account can store up to 4,000 recipes. As one satisfied user, Odey2333, shared:
"I love this app. Love that I can sync and have access to ingredients while I’m still shopping at the store."
If you ever upgrade your device or lose it, there’s no need to worry – just log back in, sync, and your collection will be restored.
Review and Update Your Recipes
Set aside time every few months – or after big cooking events like Thanksgiving or summer barbecues – to review your collection. Use your source tags to quickly verify each recipe’s origin. For recipes you’ve tried, add notes to personalize them, such as: "Tried 12/15/2025: Reduced salt by 25%, baked at 350°F for 25 minutes – family loved it" or "Substituted 1 cup all-purpose flour with gluten-free blend, turned out great." These notes turn your collection into a tailored cooking journal.
Clean up your collection by removing recipes you haven’t used in a while or duplicates. If you’re managing a mix of physical recipe cards and digital imports, make sure your tags are consistent. For example, use #Card for handwritten recipes and #Magazine-BonAppetit for magazine clippings.
Share Recipes with Family and Friends
Sharing recipes is simple with OrganizEat. Select a recipe, tap "Share," and choose email, text, or generate a link. Be sure to include the source tag in your message, like "Here’s Grandma’s banana bread, tagged #Family-GrandmaRuth from her handwritten card." If the recipient uses OrganizEat, they can import the recipe directly into their account, complete with tags. For those who don’t use the app, you can export the recipe as a PDF.
Want to share your entire collection? Use the "Share the Yum" feature, which functions like a recipe-specific Google Drive. Send an email invitation through the app, and once accepted, your family or friends can browse your collection in a view-only mode, ensuring your recipes stay intact. As OrganizEat reassures:
"Your recipes are stored password protected, and are absolutely private. Nobody can see them but you, so no need to worry about uploading secret family recipes!"
Conclusion
Organizing recipes by their source transforms a chaotic collection into an easily searchable and accessible system. Whether it’s Grandma’s cherished handwritten banana bread recipe or a magazine clipping you saved years ago, this method ensures you can locate what you need in seconds. Digital tools make it even easier by consolidating all your recipes into one place, eliminating the hassle of rummaging through multiple sources. This approach lays the groundwork for effortless recipe management.
OrganizEat takes this process a step further. The app allows you to snap photos of physical recipes, import from over 200 websites, and tag each recipe by its source. It syncs across devices, offers cloud backups, offline access, a hands-free cooking mode, and one-tap sharing options. By categorizing recipes with source-specific tags, your collection becomes both functional and deeply personal.
But it’s not just about convenience – this system also preserves the sentimental value of family recipes and heirlooms. Tags like #Family-GrandmaRuth or #Magazine-BonAppetit keep those emotional connections alive while making them easily accessible. You can even add personal notes, like ingredient tweaks or cooking adjustments, turning your recipe collection into a living, personalized cooking journal.
Sharing recipes is just as simple. Send them via email, text, or PDF without altering your original collection. For family members using OrganizEat, recipes can be imported with all tags intact. Even those who don’t use the app can receive neatly formatted PDFs.
To keep your collection running smoothly, regular upkeep is key. Periodically review your tags, update notes, and remove recipes you no longer use. This ensures your source-based system remains efficient and ready to serve you for years to come.
FAQs
How can I organize my recipes by their source?
To keep your recipes sorted by their source, begin by gathering them from everywhere – your cookbooks, recipe cards, magazine clippings, bookmarked websites, and even those snapshots on your phone. Once you’ve got everything together, consider using a tool like OrganizEat to streamline the process. This app lets you snap photos of paper recipes, import ones from websites, and upload digital files like PDFs or screenshots.
After uploading, tag each recipe with its source, like cookbook, website, or family. Using consistent tags makes it super easy to find what you need later. Don’t forget to enable cloud sync to back up your collection and access it across all your devices. With this system, your recipes will always be organized, searchable, and ready when you are – making your time in the kitchen much simpler!
How can using tags help organize my recipes?
Organizing your recipes with tags is both straightforward and incredibly effective. Tags allow you to label recipes with details such as ingredients, cooking techniques, dietary needs, or even special occasions. This system makes it a breeze to filter and sort through your collection, whether you’re hunting for a gluten-free dessert or a quick dinner idea for a busy weeknight.
By incorporating tags, you transform a chaotic recipe stash into a well-structured, searchable library. It’s a game-changer for meal planning, streamlining your grocery shopping, and ensuring your favorite recipes are synced across all your devices for instant access.
How can I keep my recipes organized and accessible anytime?
To keep your recipes organized and accessible anytime, consider building a digital recipe collection that syncs seamlessly across all your devices. A recipe organizer app like OrganizEat can be a game-changer. It allows you to store everything in one place – whether it’s a photo of a handwritten note, a magazine clipping, or a recipe you found online. You can snap pictures, import directly from websites, or create custom entries to build a personalized recipe library.
Make your collection easy to navigate by sorting recipes into broad categories like Breakfast, Dinner, or Dessert, and use specific tags such as gluten-free or 30-minute meals for quick filtering. Keep your collection fresh by regularly adding new recipes and removing outdated ones. With features like cloud backup and syncing, your recipes will be accessible on your phone, tablet, or computer – perfect for meal planning, grocery shopping, or cooking. A well-organized system not only saves time but also makes cooking stress-free!