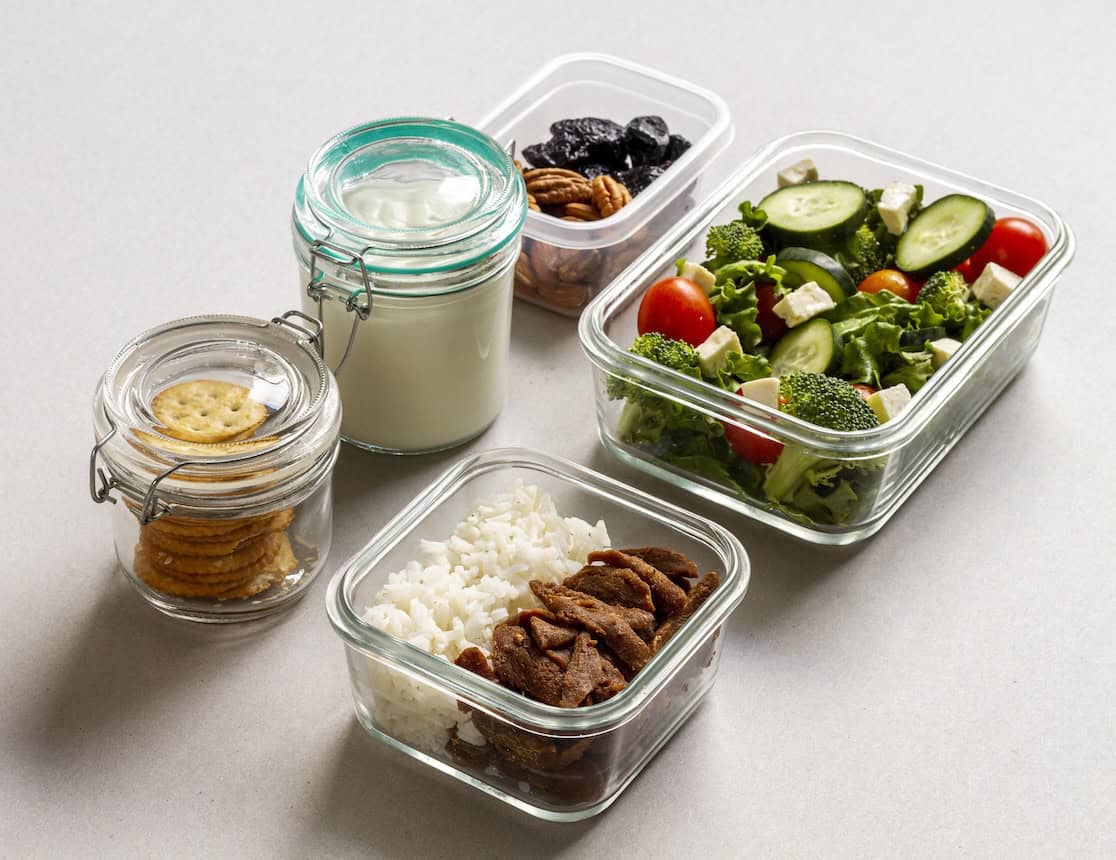

Save time, money, and stress with weekly meal prep using a digital planner. By dedicating a few hours each weekend, you can plan, shop, and prep meals for the entire week. Digital tools like OrganizEat simplify the process by organizing recipes, generating grocery lists, and syncing everything across devices.
Here’s why it works:
- Time Savings: Cut weekly cooking time by 50% and reduce decision fatigue by 78%.
- Cost Efficiency: Avoid food waste (which costs families $1,500/year) and save on takeout by planning ahead.
- Healthier Eating: Stick to dietary goals and USDA vegetable intake recommendations.
OrganizEat streamlines meal prep with features like:
- Recipe storage (import from websites, photos, or create custom entries).
- Auto-generated grocery lists categorized by item type.
- Meal planning tools (calendar view or flexible lists).
- Cooking Mode to keep recipes accessible while prepping.
Start small: upload a few recipes, plan one week, and let OrganizEat handle the details. It’s a practical way to simplify your routine and enjoy stress-free meals.
Getting Started with OrganizEat
Setting Up Your OrganizEat Account
To get started, download OrganizEat from the App Store or Google Play. Once installed, tap “Sign Up”, enter your email and password, and verify your account through the link sent to your email. From there, you’ll have instant access to features like recipe storage and grocery lists.
During the signup process, you’ll choose between the Free and Premium plans. The Free plan is great for basic needs, but if you’re managing meals for a larger household or prepping multiple meals each week, the Premium plan might be worth it. For $3.33/month or $39.99/year, Premium offers unlimited recipe storage (the Free plan limits you to 10 recipes), automatic portion adjustments, and family sharing. Premium can save you up to 5 hours of weekly meal prep by simplifying portioning and planning. Payments are processed seamlessly through Apple Pay or Google Pay, and with Premium, you’ll also enjoy an ad-free experience and priority support.
After logging in, it’s a good idea to enable cloud backup to protect your recipes and sync them across devices. Go to Settings > Account > Cloud Sync, toggle “Enable Backup”, and select iCloud (for iOS) or Google Drive (for Android). This ensures your recipes and lists stay updated in real-time across your phone, tablet, and web browser. Whether you’re planning meals on your iPad or shopping with your phone, all your data will be safe and accessible.
With your account set up and cloud backup enabled, you’re ready to make OrganizEat work for your specific needs.
Customizing Your OrganizEat App
Tailor OrganizEat to fit your cooking and meal prep style. Start by adjusting the app’s settings. Go to Settings > Edit Folder > Add Folder to create personalized foldrets like “Quick Prep Under 30 Min”, “High-Protein”, or “Batch Cook.” Add colors and icons for easy identification. For example, filtering by your “Batch Cook” category can simplify Monday lunch planning and reduce decision fatigue. Experts suggest starting with 5-7 core categories such as Breakfast, Lunch, Dinner, Snacks, and Batch Cooking. To stay consistent, set a Sunday prep reminder for 10 AM – a habit that has been shown to improve meal prep consistency by 40%.
For families with packed schedules, you can create “Weekday Quick” templates featuring meals that take under 30 minutes. Share your account with family members by sending email invites or meal plans. This setup is ideal for busy households, helping to save time and cut down on food waste by improving inventory management – a challenge faced by 70% of Americans balancing work and meal prep.
Once customized, you’re all set to start building your recipe library!
sbb-itb-6688478
Building Your Recipe Library in OrganizEat
Snap ‘n Store: Adding Recipes with Photos
Transform your physical recipe stash into a searchable digital library in no time. Open the OrganizEat app, tap the “+” button, choose “Camera”, and snap a photo of any handwritten card, cookbook page, magazine clipping, or printout. The app works its magic by converting the photo into an editable recipe, automatically separating the ingredients and directions. For example, a photo of a handwritten lasagna recipe could turn into an editable list with details like “2 cups mozzarella.”
“I had to contend with: a folder full of cutouts from magazines and handwritten notes… What a mess!” – Rachel, Lead Software Developer, OrganizEat
Once you’ve taken the photo, add a recipe title and assign it to a folder to keep everything neatly organized. Boost searchability by adding short tags for main ingredients or keywords (like “chicken”, “30-min”, or “freezer-friendly”), as the app doesn’t index text directly from images. The free trial allows you to attach 3 photos per recipe, while Extra Premium subscribers can save up to 8 photos. All recipes sync to OrganizEat’s secure cloud server and are accessible across iOS, Android, and web platforms. Plus, once a recipe is viewed online, it’s available offline too.
Ready to expand your collection? Let’s talk about importing recipes from the web.
Web Import for Online Recipes
Grab recipes from over 200 websites with just one tap. While browsing online, simply tap the “Share” icon and select OrganizEat to instantly save recipes from popular sites like AllRecipes, FoodNetwork, and Delish. The app automatically pulls in the recipe title, ingredients, instructions, nutrition details, and even images. If you prefer, you can copy recipe text from any website and paste it into OrganizEat. The app will organize the content into ingredients and steps based on line breaks.
For recipes shared on social media platforms like Facebook, Instagram, or TikTok, use the dedicated import feature to save them before they vanish from your feed. If a website doesn’t support automatic extraction, you can still use the Snap ‘n Store feature – just take a screenshot and save it. This flexibility means you can import a “30-minute chicken stir-fry” from a food blog and immediately add it to your meal plan, complete with an auto-generated grocery list.
Creating Custom Recipe Entries
Some recipes need that personal touch, and OrganizEat makes it easy to create your own.
Add custom recipes from scratch. Tap “Add Recipe” > “Type” to manually input your favorite creations or family heirloom recipes. Start with a title, then list ingredients with quantities (e.g., “1 lb ground turkey, 8 corn tortillas, 2 cups lettuce”) and add step-by-step instructions, including prep and cook times (e.g., 20 min prep, 45 min cook at 350°F). You can also include personal notes, such as “reduce salt for low-sodium diet” or “double veggies for 4 servings”, to tailor recipes to your preferences.
“Love having all my recipes in one place and not having to search through recipe books and pieces of paper!” – Mic VanderBrugghen Schulenberg
Custom recipes sync seamlessly across all your devices and work offline once cached locally. You can upload photos of your finished dishes, organize recipes into folders with custom icons, and use tags to filter by dietary needs or cooking techniques. With space for up to 4,000 recipes in the cloud, OrganizEat lets you create a digital cookbook that grows with your cooking adventures.
Planning Your Weekly Meals
Using the Meal Planner Tool
OrganizEat makes digital meal planning simple with two handy options: a calendar view or a flexible shortlist. For the calendar method, tap the “Meal Plan” tab at the bottom of your screen, then pick any day of the week. Hit “+Add recipe”, search for dishes using keywords or tags you’ve set up, and choose a meal type – breakfast, lunch, or dinner. Once selected, press “Save.” You can also tap the calendar icon on any recipe, pick a date and meal type, and click “Done.”
If you prefer a more flexible approach, try the “This Week” (or “Cook Soon”) shortlist. Just tap the checkmark icon (✔) on any recipe to add it to a simple list of meals you plan to make without committing to specific days or times. When it’s time to shop, use the “Add to groceries” option from the “More” menu (three lines icon) to pull ingredients from your scheduled recipes into a grocery list.
“I love this app. Love that I can sync and have access to ingredients while I’m still shopping at the store.” – Odey2333
Once you’ve scheduled your meals, you can always tweak your plan to match your evolving week.
Improving Your Weekly Plan
Adjust your meal plan as needed to keep things running smoothly. If your plans change, swipe right on a scheduled recipe and tap the red “Delete” button. To add a new recipe, select the day and hit “+Add recipe.” If you want to start fresh, use the “Clear Plan” option in the “More” menu to reset the calendar. The calendar view is ideal if you like a highly organized schedule with set mealtimes, while the “This Week” shortlist is perfect for those who prefer a more flexible approach to cooking.
Share your meal plan effortlessly via email, text, or print using the “More” menu. You can choose weekly or monthly formats, and any updates sync across all your devices. Plus, all imported recipes remain accessible offline, making it easy to save recipes from the web for later use, so you won’t lose them even if the original website goes offline.
Creating and Syncing Grocery Lists
Auto-Generating Grocery Lists
OrganizEat makes turning your meal plan into a grocery list effortless. If you’ve scheduled meals using the calendar view, head to the “Meal Plan” tab, tap the “More” menu (the three lines), and select “Add to groceries.” From there, you can choose to export ingredients for the week or the entire month. The app will automatically populate your grocery list with all the ingredients from your planned recipes.
In the “This Week” view, tap the three dots (⋯) and choose “Add All to Grocery List” to include every ingredient from your weekly plan. Want to add items from a specific recipe? Open the recipe and tap the shopping cart icon to send its ingredients straight to your grocery list.
Editing and Syncing Lists
Tailor your grocery list to include everything you need, even items outside your recipes. In the Grocery tab, tap the “+” button to manually add things like paper towels or other household essentials. Need to clean up your list? Simply swipe right on an item and tap “Delete”, or use the “Clear List” option in the “More” menu to wipe the entire list at once.
Your grocery list syncs effortlessly across all devices linked to your OrganizEat account. Whether you’re using iOS, Android (5.0+), or a web browser like Chrome, Edge, or Safari, your list is always up to date. This means you can plan meals on your computer and pull up the same list on your phone while shopping. Want to loop in family members? Use the “Share List” option in the Grocery tab’s “More” menu to send the list via email or text.
With these synced lists, meal planning stays smooth and organized, whether you’re at home or out running errands.
Executing Meal Prep with Cooking Mode
Batch Cooking with Cooking Mode
Once your ingredients are ready, switch on Cooking Mode to keep recipes displayed full-screen and prevent your screen from dimming. No more struggling with flour-covered fingers to wake up your phone – just focus on cooking.
“Screen stays on – no more greasy fingers on screens!” – OrganizEat
When batch cooking, use the “This Week” checkmark icon (✔) to group all your recipes for the week into one convenient place. This way, you can seamlessly move from one dish to the next without searching for individual recipes.
Cooking Mode supports all recipe formats you’ve saved – whether it’s a typed recipe, a web import, or even a photo of Grandma’s handwritten notes. It digitizes everything while preserving your personal touches, so you can follow those treasured instructions without hassle.
With Cooking Mode simplifying your workflow, you’ll find it even easier to share your meal prep plans with your family.
Sharing Recipes for Family Coordination
After a smooth batch cooking session, keeping your family in the loop helps everything run like clockwork. Use the “Share your recipes” feature to invite family members to your account via email. Once they accept, they can access all your recipes on their own devices. This way, one person can man the stovetop while another handles ingredient prep – all using the same recipe.
Need to share your entire weekly meal plan? Tap the “More” icon (the three lines) in the Meal Planner screen, select “Share Plan,” and send it via text or email. This ensures everyone knows what’s cooking and when, making it easier to divide tasks and keep meal prep stress-free.
Reviewing and Improving Your Meal Prep Routine
Tracking Weekly Results
Every Sunday, take a moment to review how your meal prep week went. Use the “+Add a note” feature in the Meal Planner to jot down any changes, like eating out unexpectedly or using leftovers instead of a planned meal. This gives you a full picture of your eating habits, not just what you initially planned.
At the end of the week, check your “This Week” shortlist to see which recipes you actually cooked. If certain recipes stay unchecked for weeks, it might mean they’re too time-consuming or that your shopping list needs tweaking. You can even add custom tags like “Success” or “Too Long” to recipes after trying them. Over time, this creates a handy feedback system you can search through when planning future meals.
Keep an eye on a few key metrics to track your progress. For example:
- Recipe completion rate: Did you prep all the meals you planned?
- Time spent prepping: Aim to keep it under 2 hours total.
- Food waste percentage: Try to keep waste below 5% by using leftovers wisely.
If you notice issues like high food waste or overspending in Week 1, use that information to adjust your menu and shopping list for the following week. These small changes can make your meal prep routine more efficient and budget-friendly.
Using OrganizEat’s Premium Features
Once you’ve gathered insights from your weekly reviews, Premium tools can take your meal prep to the next level. Upgrading to Premium unlocks unlimited recipe storage and advanced analytics to track things like prep time, grocery savings, and how closely you stick to your meal plan.
With Premium, you can set long-term goals and view detailed charts that show your progress in areas like reducing prep time, cutting waste, and saving money. Plus, the Backup & Sync feature keeps all your data synced across devices, so you can review your meal plans on a larger screen, like a tablet or computer, for a clearer overview.
How I Plan a Week of Meals in Minutes | Simple Step-By-Step System
Conclusion
OrganizEat simplifies the entire process of meal planning, from organizing recipes to prepping meals and managing grocery lists. No more juggling scattered notes, forgotten ingredients, or last-minute dinner dilemmas. With everything neatly in one place, you can spend less time stressing over logistics and more time enjoying the meals you’ve prepared.
One standout advantage is the time it saves. Auto-generated grocery lists take the guesswork out of shopping, while Cooking Mode lets you stay hands-free in the kitchen. Together, these features can save you 2–3 hours each week while also reducing food waste by up to 50%. This level of efficiency not only saves time but also helps reduce the daily stress of meal prep. When your week is planned and ingredients are ready, there’s no more scrambling to figure out dinner at the last minute.
Whether you’re into a structured calendar view or prefer the flexibility of a “This Week” shortlist, OrganizEat works with your style. Plus, with cloud syncing, your meal plan stays updated across all devices, keeping everyone in your household on the same page. By integrating every aspect of meal prep into one app, OrganizEat becomes an indispensable tool for busy families.
Start small: upload a few recipes, plan a week, and generate your first grocery list. You’ll quickly see how this app can create a smoother, more manageable routine.
FAQs
How do I meal prep if my weekly schedule changes?
To make meal prep work with a shifting schedule, try planning with flexibility in mind. Instead of locking meals into specific days, create a weekly list of recipes. This gives you the freedom to choose what to cook based on your availability. Include a few simple, go-to meals as your “anchors” and mix in other options that you can easily swap around. Tools like OrganizEat’s meal planner can be a big help, allowing you to reschedule recipes effortlessly and stay on top of your plans even when your week changes.
Can OrganizEat adjust recipes for different serving sizes?
OrganizEat offers recipe scaling tools that allow you to adjust ingredient quantities based on your desired serving size. Whether you’re preparing a meal for an intimate dinner or a big celebration, this feature simplifies the process of tailoring recipes to fit your needs.
How do I use OrganizEat offline while shopping or cooking?
Once you’ve downloaded the OrganizEat app and signed in, you can access your recipes, meal plans, and shopping lists even when you’re offline. Any updates you make – whether it’s editing a recipe or tweaking your shopping list – will automatically sync the next time you’re connected to the internet. Just make sure to load your shopping list ahead of time, as actions like logging in or adjusting the date range will need an internet connection.