
You've already done the hard part. The roast chicken is glossy, the crumb on the cake looks right, and the pasta shot has that little curl of steam you only catch once. The files are sitting on your laptop in neatly named folders, already edited, color-corrected, and sharpened. Then Instagram asks you to jump back to your phone, and suddenly a clean workflow turns into AirDrop, email, cloud folders, or messaging yourself images like it's still years ago.
That's why learning a reliable upload from PC Instagram workflow matters so much for food bloggers. It's not only about convenience. It's about keeping your editing decisions intact, writing better captions on a full keyboard, and publishing the right kind of content with the right tool. If you save a lot of inspiration while planning posts, it also helps to keep your source material organized, especially if you regularly save recipes from social media.
Table of Contents
- Why Uploading from Your PC is a Game Changer
- The Direct Method Using Instagram on Your Browser
- Advanced Scheduling with Meta Business Suite
- Comparing Your PC to Instagram Upload Options
- How to Prep Food Photos and Videos for Perfect Uploads
- Writing Great Captions and Troubleshooting Upload Issues
Why Uploading from Your PC is a Game Changer
Food bloggers used to have a strange bottleneck. You could edit in Lightroom, crop in Photoshop, name files properly, and draft captions in a real document. But the last step often meant shipping everything back to a phone just to publish. That gap made the whole process feel less professional than the rest of the workflow.
That changed in October 2021, when Instagram began allowing users to create feed posts directly from instagram.com on desktop, a shift away from the old mobile-only setup, as outlined in Mailchimp's guide to posting on Instagram from a PC. For anyone who works with batches of recipe photos, that update mattered immediately. You could finally move from edit folder to published post without detouring through a mobile app.
The strategic case is just as important as the practical one. Instagram's scale is enormous. Sprout Social notes projections of about 3 billion monthly active users worldwide in 2026 and roughly 182 million users in the United States, while also citing a more conservative estimate of 2 billion monthly active users worldwide as of early 2025 in its roundup of Instagram statistics. For food creators, that means desktop publishing isn't a niche workaround. It's part of operating where your audience already is.
Practical rule: If your photos are edited on a computer, the cleanest workflow is usually to publish from the same computer unless you need a mobile-only feature.
For food content, the gain is control. You can compare nearly identical hero shots side by side on a larger screen, choose the frame where the glaze looks richest, and catch small issues like over-bright whites on whipped cream or a distracting crumb near the edge. Those decisions are harder on a phone.
The Direct Method Using Instagram on Your Browser
The browser uploader is the fastest way to post a polished feed image or a simple video when everything is already on your computer.
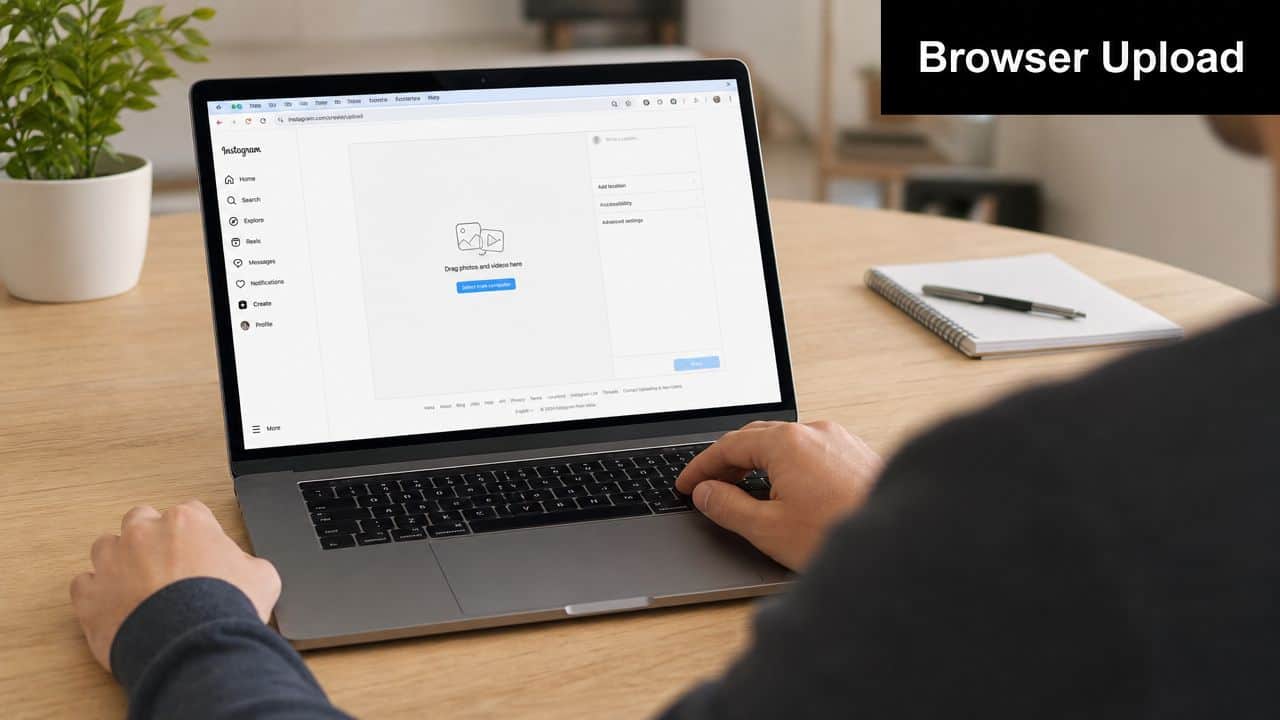
When the browser uploader works best
This is the method I'd use for a finished recipe post with one standout cover image, a short kitchen clip, or a quick carousel of process shots. If you just edited a tray of brownies and want them live while they still feel seasonal or timely, the native browser tool is the least fussy option.
It also suits creators who write long captions. Recipe introductions, serving notes, substitutions, and storage tips are easier to draft and revise on a full keyboard. If your workflow includes pulling recipe details from posts later, tools that import recipes from Instagram can help keep your content library organized after publishing.
The cleanest desktop posting workflow
Open Instagram in your browser and sign in. On desktop, the posting flow includes the familiar plus icon and a select from computer option, which made desktop posting feel native instead of improvised after the 2021 rollout noted earlier.
A simple sequence works well:
-
Choose the final export first
Don't upload multiple near-duplicates and decide inside Instagram. Pick your winner in your computer folder first, where you can zoom in and compare detail. -
Upload from the browser
Click the plus icon, choose your file, and let Instagram pull it into the composer. For food images, I usually check the crop immediately because tight plating shots can lose important garnish or steam at the edges. -
Adjust only lightly inside Instagram
If the file is already edited well, don't rebuild the image with heavy in-app filters. Minor brightness or framing tweaks are fine. Big corrections are better handled before upload. -
Write the caption in full before sharing
Desktop is ideal for line breaks, ingredient highlights, and a clear call to action like asking whether readers want the written recipe, a freezer version, or a dairy-free swap.
After you've got the basics down, this walkthrough can help if you want to see the flow in action:
A browser upload is strongest when your content is already finished. It's not the place to rescue a weak crop or fix muddy color at the last minute.
What this method does not do well
The direct browser route is efficient, but it's not my choice for everything.
- Batch planning gets clumsy because you're creating one post at a time.
- Story workflows are weaker if you want stickers, layered design, or frequent posting.
- Content calendar visibility is limited because you can't really see the week as a system.
- Last-minute changes are manual since there's no broader dashboard for moving pieces around.
For a single hero dish, though, this method is excellent. It's fast, official, and close to frictionless.
Advanced Scheduling with Meta Business Suite
Once you stop posting one dish at a time and start thinking in weeks, the browser uploader starts to feel small. Food blogging usually runs on rhythms. Grocery haul on one day, prep clips on another, hero image after testing, then leftovers, storage tips, or a Reel later in the week.
Why food bloggers outgrow one-off posting
If your content comes from real cooking, you rarely create one isolated asset. One recipe test can give you a plated final shot, a vertical pouring clip, a tray bake overhead, a behind-the-scenes Story, and a leftovers angle for the next day. Posting each piece manually, in the moment, wastes the way food content naturally gets produced.
That's where Meta Business Suite becomes useful. It gives you a more organized publishing environment from your computer, especially if you're trying to maintain a steady rhythm without living inside the Instagram app.
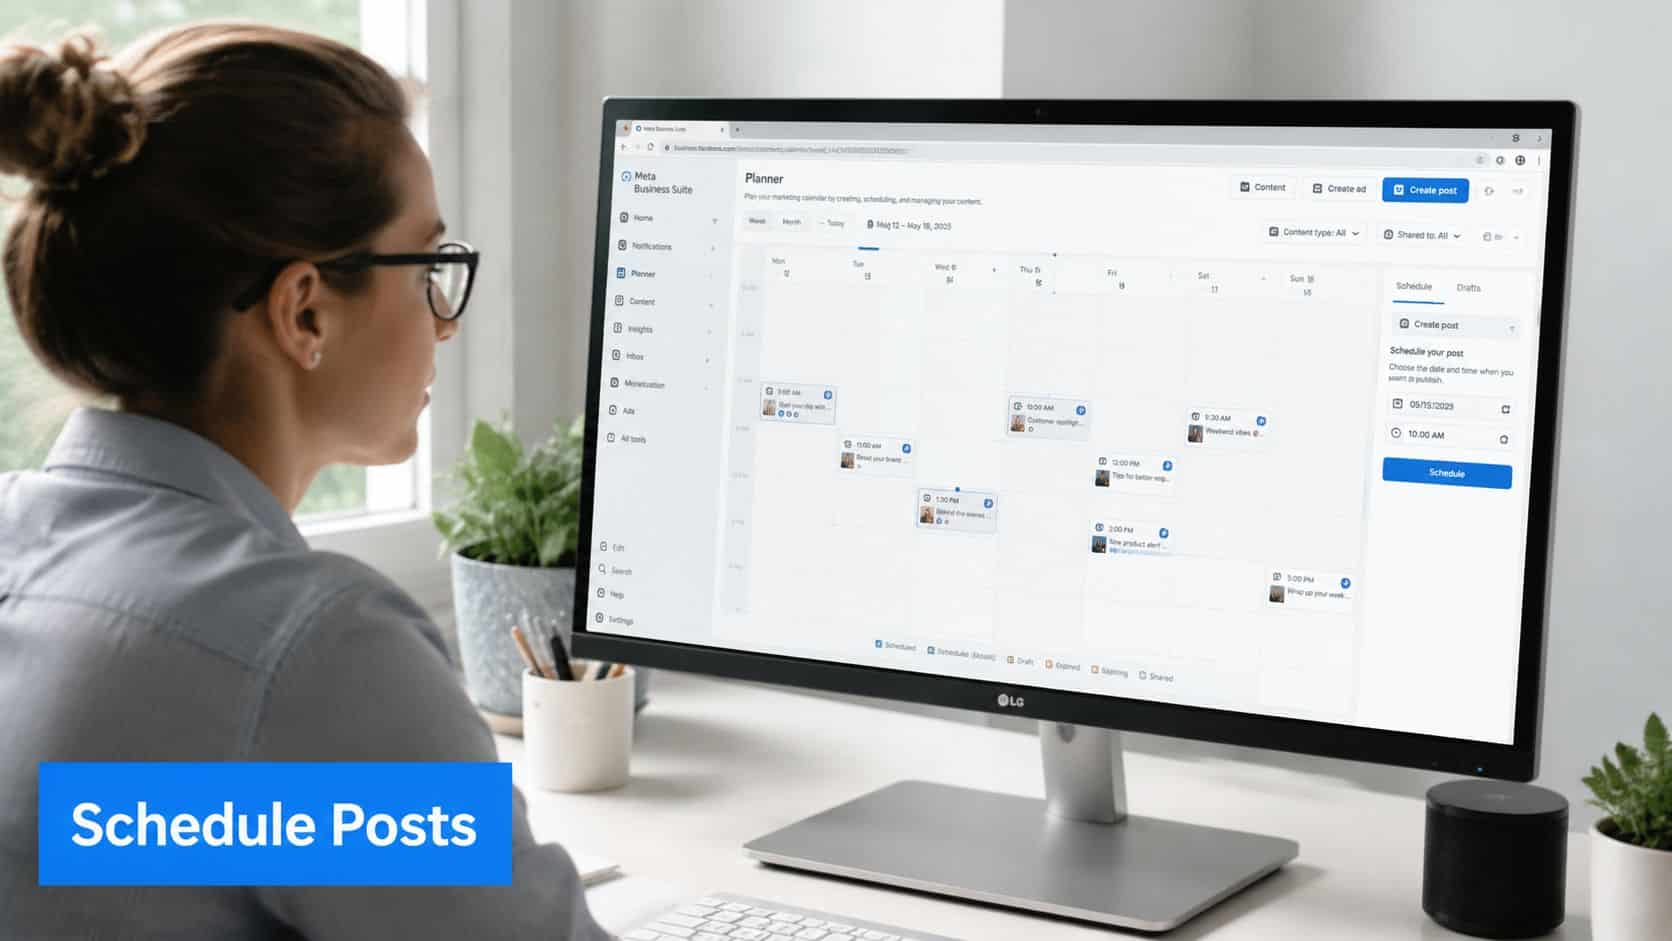
A practical Business Suite setup
The setup is straightforward in concept. Connect your Instagram account through Meta's business tools, then work from the planner and post composer instead of posting ad hoc from the feed interface.
What matters more is how to use it well:
-
Plan around cooking days
If you cook three recipes on Sunday, upload all supporting media that day while filenames and sequence still make sense. -
Draft before you schedule
Some food captions benefit from a cooling-off pass. What sounds charming right after baking can sound rambling the next morning. Drafting first helps tighten the post. -
Match content type to intent
A polished Reel announcing a new recipe deserves a scheduled slot. A messy but appealing countertop Story may still be better live and spontaneous. -
Use the calendar view as an editorial check
Seeing posts together helps you avoid repetitive visuals. Five beige pasta dishes in a row might be delicious, but the grid can feel flat.
Kitchen workflow note: Scheduling is less about posting less often and more about posting when your hands are busy cooking instead of typing captions.
If you want more ideas on how creators schedule Instagram content effectively, it's worth reviewing planning approaches that focus on batching and consistency rather than constant reactive posting.
What to use it for every week
For food bloggers, I'd divide desktop publishing jobs into three categories inside Business Suite.
First, anchor posts. These are your major recipe assets. The finished tart, the weeknight dinner carousel, the Reel that shows texture or technique. They deserve proper spacing, thoughtful captions, and a planned slot.
Second, supporting content. This includes reminders, alternate photos, seasonal tie-ins, and repurposed clips. These often perform better when they fill the gaps between anchor posts instead of competing with them.
Third, draft storage. Even if you don't schedule every item, it helps to gather media, save caption ideas, and hold posts until the timing is right. That's especially useful for holidays, produce season, or recipe series.
Business Suite isn't always the prettiest tool, but it solves a real problem. It turns your desktop into a planning station instead of just a place where edits happen before everything gets pushed back to your phone.
Comparing Your PC to Instagram Upload Options
A tray of cinnamon rolls comes out of the oven at 4:30, the light is perfect for ten minutes, and the edited files are already sitting on your computer. At that point, the right upload method matters because speed, crop control, and reliability all affect whether that content goes live looking polished or rushed.
For food bloggers, the best option depends less on the button you click and more on the job the post needs to do. A casual kitchen Story has different requirements than a sponsored Reel or a carousel for a new recipe post.
PC Upload Methods at a Glance
| Method | Supported Content | Scheduling? | Best For |
|---|---|---|---|
| Instagram browser uploader | Feed photos, videos, simple post publishing | No built-in planning workflow for broader content management | One polished recipe post or quick carousel from your computer |
| Meta Business Suite | Feed posts, planned content workflows, draft management | Yes | Weekly planning, batching, and maintaining consistency |
| Browser device emulation | Story-style mobile view in some situations | No | One-off Story uploads when you need a workaround from a desktop |
| Third-party scheduling tools | Varies by platform and account setup | Usually yes | Teams, multi-account workflows, or more complex automation needs |
How to choose based on the content itself
Use the Instagram browser uploader for finished assets that are ready now. I like it for a plated hero shot, a quick carousel of step photos, or a short video clip that does not need calendar planning. It keeps the path short. Export, upload, write the caption, publish.
Use Meta Business Suite when timing matters as much as the media. That usually means recipe launches, holiday content, sponsored posts, or a week of content tied to one batch-cooking session. The main benefit is editorial control. You can see whether three beige dishes are about to land back-to-back, whether your Reel is competing with a carousel, and whether your posting rhythm makes sense before anything goes live.
Use browser device emulation only for low-risk Story content. Meta documents browser developer tools for mobile testing in Chrome DevTools, which is the same general workaround people use to access mobile-style upload views from a desktop in some cases, as explained in Chrome DevTools device mode documentation. It can work, but it is still a workaround. I would trust it for a flour-dusted behind-the-scenes Story or a quick poll sticker replacement. I would not trust it for a launch-day asset that needs to publish cleanly on the first try.
Use third-party scheduling tools if your workflow includes approvals, multiple brands, or recurring campaigns. A solo recipe creator may not need that extra layer. A blogger managing a personal brand, a cookbook account, and client content often does. If that sounds familiar, broader comparisons can help you find your ideal automation tool.
There is also a practical middle ground. Organize your edited files, old family recipe scans, and reusable brand assets on your computer first, especially if part of your content starts offline. A good system for digitizing handwritten recipes and food photos on a Mac makes desktop publishing much easier because the content is already sorted before you upload anything.
Match the method to the stakes of the post. Low-stakes content can tolerate a fussy workaround. High-stakes content should go through the most dependable path you have.
That is the comparison. The browser uploader is best for fast, finished posting. Business Suite is better for planned publishing and visual pacing. Device emulation is a backup tool. Third-party platforms make sense once your content operation gets more complicated than one person posting tonight’s pasta.
How to Prep Food Photos and Videos for Perfect Uploads
You finish editing a glossy pasta close-up on your computer, upload it, and Instagram still makes the basil look soft. That usually is not an upload problem. It is a prep problem.
Desktop posting helps because you can control the file before Instagram touches it. For food bloggers, that matters more than the posting method itself. A quick kitchen Story can survive a looser workflow. A polished carousel for a recipe post or a Reel tied to a launch needs tighter export choices, cleaner crops, and a file size that will process without a fight.
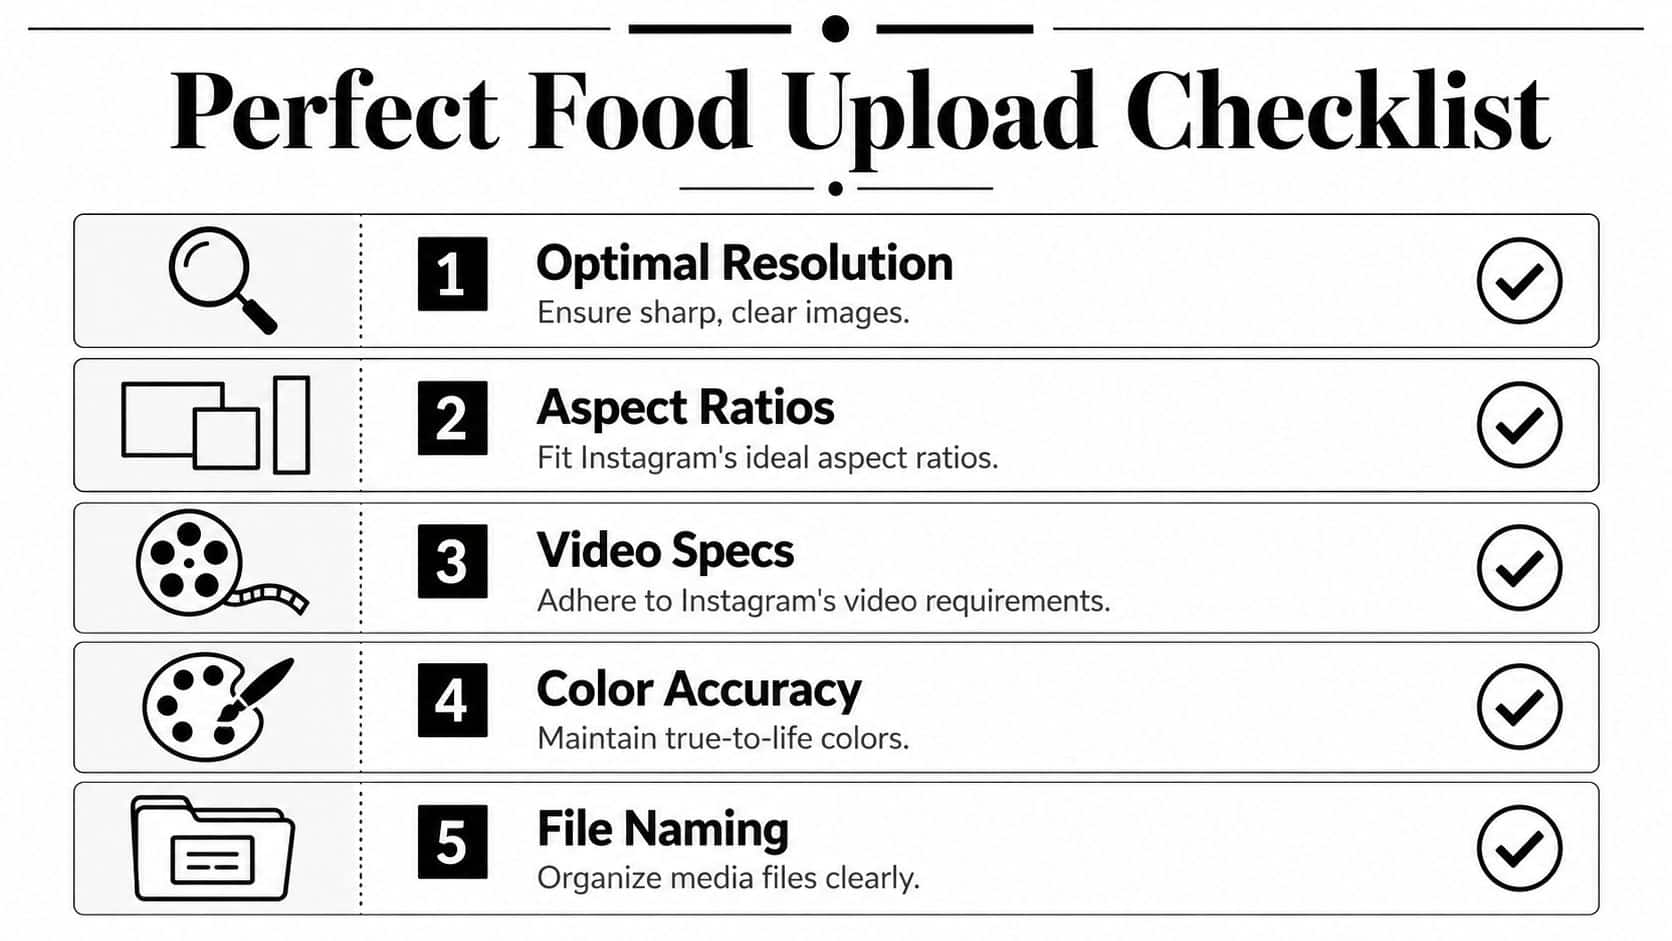
Quality starts before you upload
The quality advantage of desktop uploading comes from preparation and control. Guidance summarized by Influize in its article on how to post on Instagram from a PC points in that direction. The practical takeaways are straightforward. Export images at Instagram-friendly sizes, use JPEG for photos and PNG for graphics, keep file weight reasonable, and resize intentionally before upload instead of sending a huge original and hoping Instagram handles it well.
That matches what I see with food content. An overhead tart shot exported cleanly from Lightroom usually holds texture better than a giant camera file pushed through with no prep. Instagram still compresses the image. You just get better results when the file is already sized, sharpened, and cropped for the platform.
Export settings that usually hold up well
For still images, a few habits make a noticeable difference:
-
Export for Instagram’s frame, not your camera’s
For feed posts, 1080px wide is a strong target. It gives you control over sharpness and detail instead of leaving all resizing decisions to Instagram. -
Choose the file type based on the content
JPEG works best for finished food photography with steam, crumbs, sauce, and natural light gradients. PNG is more useful for graphics, text-heavy recipe cards, and step labels. -
Crop before upload, with the final layout in mind
Food images often lose their best details at the edges. Chopped herbs, spoon handles, pie crust fluting, and negative space for text can all disappear if you leave the crop decision too late. Desktop editing makes it easier to test a square, portrait, or Reel cover crop before publishing. -
Name files like you will need them again next month
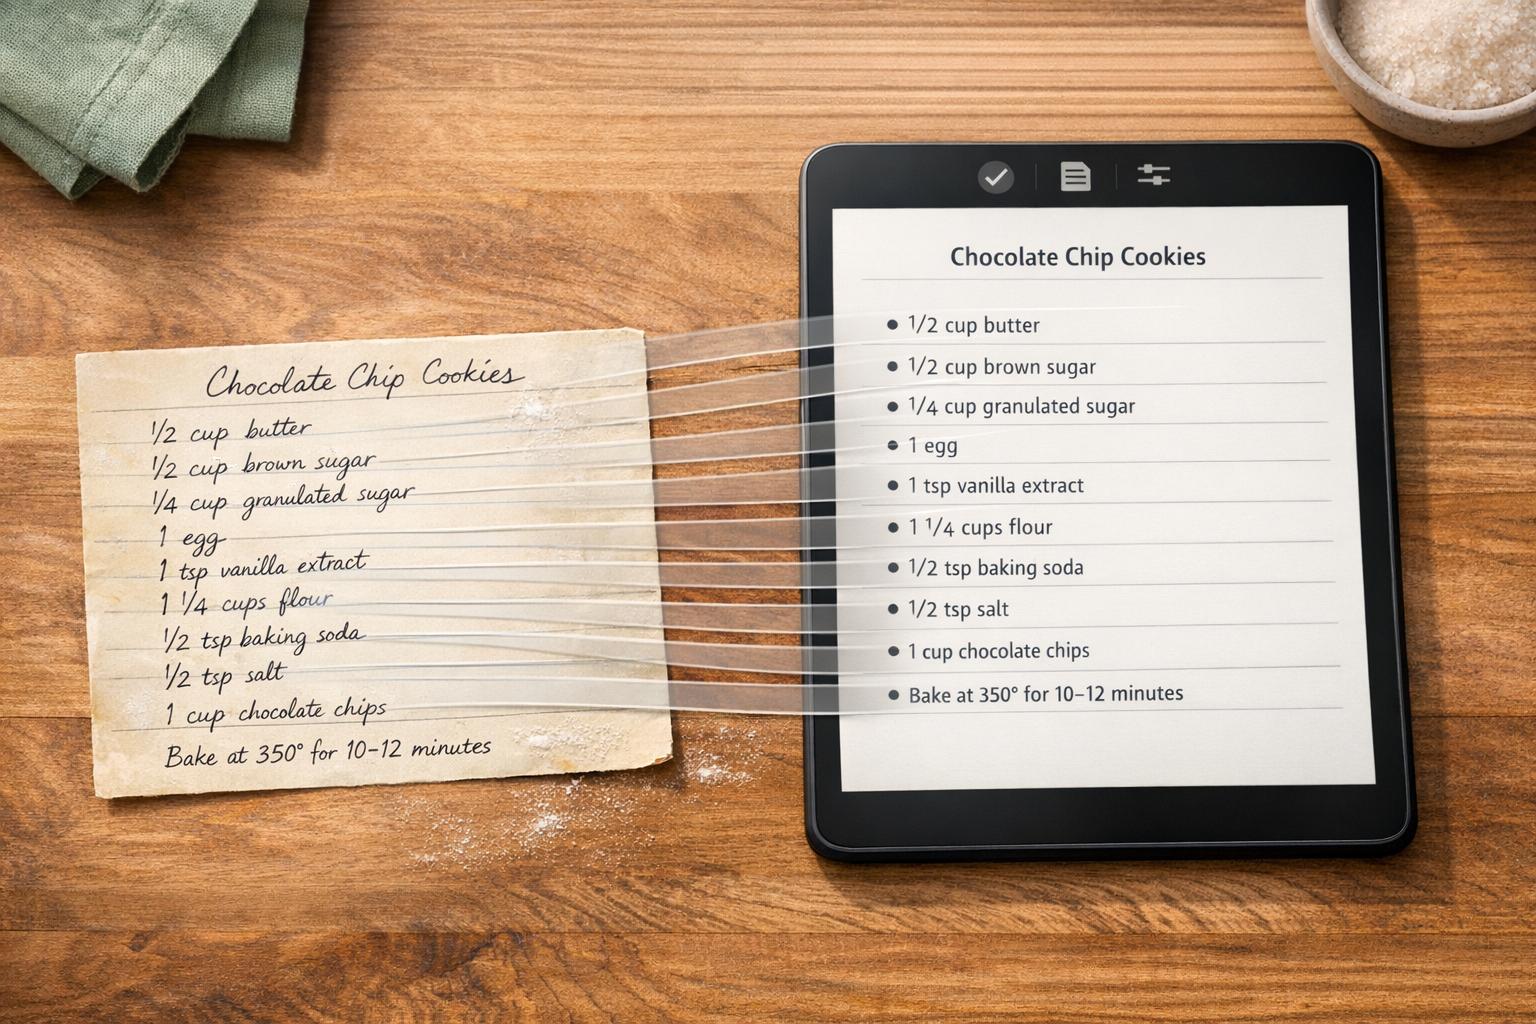
Clear filenames save time and prevent version mistakes. If your content library includes scanned family recipe cards, old cookbook clippings, or printed food photos, this guide to a photo scanner workflow for Macs is useful for keeping those assets organized before they enter your Instagram queue.
One small composition habit helps too. Leave a little extra room around garnishes, utensils, and steam trails. Instagram previews often feel tighter once the post is live than they do inside editing software.
Video prep that avoids processing headaches
Video punishes sloppy prep faster than photos do. Steam, pouring syrup, bubbling cheese, and crispy texture shots can turn muddy if the export is too heavy or encoded poorly.
As noted earlier, browser-based publishing tends to work better with standard exports and a computer that can process them comfortably. For food Reels, stick with MP4 (H.264), keep the bitrate reasonable, and trim every second that does not add appetite or instruction. If a clip hangs during processing, I usually make a lighter export before trying again. That is faster than repeated uploads of the same oversized file.
If you want a broader reference for setup choices, this guide to Instagram video format is a useful check before you export.
Resize, trim, and compress before uploading. Instagram should publish your file, not rescue it.
The best method depends on the content. A quick Story from the kitchen can be informal and lightly edited. A recipe Reel needs a strong cover frame, balanced color, and clean pacing. Warm kitchen lighting is especially worth checking on desktop. If the oranges and yellows already look heavy on your monitor, they often look worse after upload.
Writing Great Captions and Troubleshooting Upload Issues
A good Instagram post doesn’t stop at a clean upload. Food content has to do two jobs at once. It has to make someone hungry, and it has to make the recipe feel doable.
Captions that fit recipe content
The strongest captions for food posts usually follow a simple rhythm:
-
Open with the payoff
Lead with what the dish is and why it matters. “Crispy-edged roast potatoes with garlic butter” is stronger than a long preamble. -
Add one useful detail
Mention what makes the recipe easier, faster, or different. Maybe it’s one bowl, freezer-friendly, or built from pantry ingredients. -
Tell people what to do next
Ask a specific question. Would they make it spicy? Do they want the full recipe in comments, bio, or Stories? -
Use alt text thoughtfully
Describe the dish in a way that helps accessibility and also reflects what’s in the frame. Be literal and clear.
For recipe creators, desktop is where caption writing gets better. You can structure ingredients, add line breaks that are clearly readable, and avoid the rushed feeling that often shows up when posting from a phone between kitchen tasks.
Quick fixes when Instagram fights the upload
Even with a tidy desktop workflow, a few problems show up often.
-
Upload failed
Recheck the file format first. Then try a browser refresh and upload again. If the export is unusually large, create a lighter version instead of retrying the same file over and over. -
Video stuck on processing
This usually points to the file, not the caption. Re-export as MP4 (H.264), keep the bitrate moderate, and trim anything unnecessary. -
Unexpected crop
Your desktop editor and Instagram preview may not feel identical. Revisit the crop with more margin around important food details, especially tall garnishes or utensils near the frame edge. -
Caption formatting broke
Draft captions in a plain-text document first, then paste into Instagram. Fancy formatting copied from styled apps can behave unpredictably.
The goal is repeatability. Once you know which export settings, crop styles, and publishing tool work for your content, Instagram from a PC becomes less of a workaround and more of a stable part of your food blogging system.
If your Instagram workflow also includes saving recipes, organizing inspiration, and keeping family favorites in one searchable place, OrganizEat gives you a practical way to store recipes from social posts, handwritten cards, and websites in one library you can access across devices.